The SwiftRiver engine has a few moving parts. This guide covers what you need to do to get a basic SwiftRiver installation going. Mix and match these instructions to match what you know you need.
Recommended Platforms
- Ubuntu 10.04 TLS +
- Debian 6.0 (Squeeze)
This guide does not cover installation under Windows systems. If you want to do that, please use the SwiftRiver windows instructions and update them with anything you learn.
Requirements
- Java JDK 1.5 or greater: preferably Java 1.6 (also known as Java 6)
MySQL Server version 5.1 or greater
Apache Tomcat (version 6.0 or greater) or other servlet container
Apache HTTP server with mod_rewrite enabled
PHP version 5.3 or greater
Python version 2.6 or version 2.7
RabbitMQ version 3.0 or greater
Sendmail or other Mail Transfer Agent
Handy guides
- Install Solr 4.6 with Tomcat 7 on Debian 7: gives you Java, Tomcat, Solr (but don’t secure the admin page as suggested). This guide works for Ubuntu too. Note that this script doesn't install the Java JDK required to install Swiftriver.
Notes
- These instructions assume that you’re installing Swiftriver on localhost. Please change the steps below if you’re using a different hostname for your machine.
- We'll use /opt/swiftriver as the base directory to install all the Swiftriver files. If you want to use a different base directory, make sure that you use the correct path consistently as you follow these instructions.
- These instructions are based on a script written by Emmanuel Kala, which is a more compact version of this guide.
- Always check the
/var/log/tomcat7/catalina.outlog file during installation, to watch for any weird exceptions that might stall SwiftRiver's initialisation. Some of the paths used in this guide might differ from your environment: please adapt accordingly. We recommend adding these paths to your bash, as a few services might benefit from that:
Installing the API
Set up API war file in Tomcat
Checkout API
Compile API and copy resources to the correct directories
Update the entries below in file swiftiver-api.xml. You shouldn't need to change any other values (More details are in the file below)
Setting up the database
Log into your MySQL database and execute the following commands:
Then exit the MySQL prompt and import the mysql schema into the database:
Tomcat, Java and JDBC
If your application fails to start later on, it might be because it's not connecting to the MySQL database. To solve that, you'll need to make sure that the JDBC driver is installed on Tomcat.
Setting up Solr
To get Solr going, we need to move some files around:
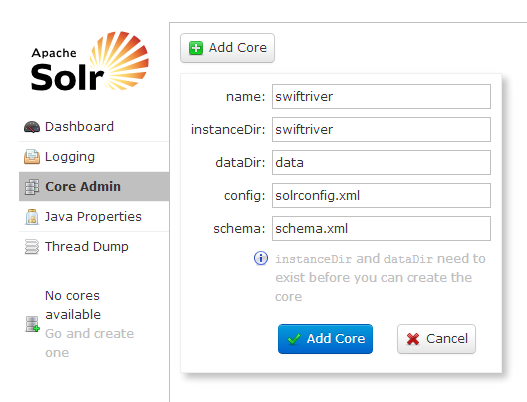
Once that's done, navigate to http://localhost:8080/solr, Go to Core Admin > Add core and fill in the fields as shown below.
Get it going!
With all that in place, all you have to do is:
If that's what you got, do a little dance! You're half way there!
(If not, check your logs, and battle it kid!)
SwiftRiver UI Client
As you can see from the architecture, the UI client is separate from the API. If you're feeling Rambo, just jump straight into interacting with the API.
If not, here's what you have to do to get the UI going.
(Assuming that your DocumentRoot is on /var/www)
Once that's done, update the following files:
application/config/auth.php
application/config/site.php
modules/SwiftRiver_API/config/swiftriver.php
You shouldn't need to change any other files.
Once that's done, do an apache2ctl restart for good measure and you should be good to go. Visit http://localhost and do another dance.
mod_rewrite
If you get a "Not Found" response when the system redirects you to /login, maybe mod_rewrite is getting in the way. If that's the case:
- Check that mod_rewrite is installed and enabled. (run a2enmod rewrite in case it isn't)
- Make sure you have AllowOverride
All(as opposed toNone) for your directory on the apache conf file (restart Apache after that!)
Indexing / Crawling / Messaging services
If you've done everything above, you should be able to log into the UI, but nothing much else. Let's change that! There's quite a bit to be done, so get a cup of coffee and hold tight.
Please make sure the RabbitMQ server is installed before proceeding - you shouldn't need to change any configurations for it.
First, install all the requirements for the services below
Services requirementsCheck out the Swiftriver Core
Configure services
RSS ServiceMedia Extractor serviceSemantics Queue serviceTwitter serviceCopy lib folder to services folder
Build and install the Swiftriver API Client
API client configInstall the dropqueue processor
Dropqueue configInstall rules processor
Rules processor- This is everything to configure for now. Well done for making it to here! You are a champion!
Installing Swiftriver as a service
Now that we configured everything, all you have to do is copy and paste the lines below on your command line so that Swiftriver runs as a service
Creating Swiftriver service
Now, all you have to do is run service swiftriver start, and enjoy your success!
More info
Logs to watch
If during installation, anything doesn't behave as expected, here are the logs you should check (double points if you paste log dumps into bug reports!):
- Apache logs (/var/logs/apache2, mainly error.log)
- Tomcat logs (/var/logs/tomcat7, mainly catalina.out)
- Application logs (i.e.: /var/www/application/logs)
- MySQL logs - enable the general log if you want to really get to the thick of what's going on
- Service logs - each service will have logs being written on their respective
logsdirectory. Keep an eye on those!
We can't stress enough how helpful these are. ![]()
Issues with RabbitMQ
If you run rabbitmqctl status and you see something like Error: unable to connect to node 'rabbit@swiftriver-dev': nodedown as a response, RabbitMQ is having problems starting.
Run sudo service rabbitmq-server restart and RabbitMQ should be good again.
Example swiftriver-api.xml
swiftriver-api.xml properties
| Parameter | Description |
|---|---|
| mqHost | The host running the RabbitMQ server |
| mqUser | User to connect to RabbitMQ |
| mqPassword | Password for the user used to connect to RabbitMQ |
| solr/serverURL | URL of your Solr server |
| solr/indexerProperties | Location of the properties file for the indexer - a background process that periodically updates Solr with the new drops |
| indexer/lastDropIDPropKey | The property key that specifies the ID of the last drop to be posted to Solr. This value serves as the reference point for fetching new drops |
| indexer/batchSizePropKey | The property key that specifies the maximum number of drops to post to Solr during each run |
| indexer/runInterval | The property key that specifies how often (in milliseconds) the indexer should check for new drops and update Solr |
| authSchemeName | Name of the authentication scheme. The possible values are database and crowdmapid |
| crowdmapid/serverURL | URL of the CrowdmapID deployment |
1 Comment
Hide/Show CommentsM. Edward (Ed) Borasky
I'm trying to build a Docker image for SwiftRiver. Has anyone else attempted this?